
How to Measure for New Kitchen Cabinets: The No-Nonsense DIY Guide
9 March 2026
A single 2mm mistake on your tape measure is the difference between a seamless Australian-made kitchen and an expensive pile of scrap board. It’s a fact that roughly 15% of DIY renovations hit a standstill because of basic measurement errors that lead to frustrating delays and wasted budget. You likely feel the pressure of getting every number right, especially when Aussie house walls are rarely as straight as they look.
We get it. Measuring for a renovation shouldn’t feel like a high-stakes math exam. This guide teaches you exactly how to measure for new kitchen cabinets using millimetre precision so your custom flat pack units slide into place without a struggle. You’ll master our professional 3-point check for out-of-square walls and learn how to account for uneven floor levels like a seasoned tradie. We’re stripping away the confusion of centimetres and giving you the exact blueprint to order your kitchen online with zero hesitation.
Key Takeaways
- Adopt the “Measure Twice, Order Once” mindset and discover why millimetres are the only unit of measurement that matters for a zero-fuss fit.
- Master a simple “birds-eye” mapping technique and the step-by-step process for how to measure for new kitchen cabinets with trade-level accuracy.
- Learn the “Centerline” method to account for plumbing, power points, and structural obstacles before they become expensive installation headaches.
- Understand standard Australian ergonomic heights and clearances to ensure your custom layout meets local trade standards and functional requirements.
- Find out how to turn your rough sketches into precision-cut, Australian-made cabinets that bypass the limitations of “standard” big-box retail sizes.
Table of Contents
- The Golden Rules of Precision Kitchen Measurement
- Step 1: Mapping the Room Footprint and Walls
- Accounting for Services and Structural Obstacles
- Bench Heights, Clearances, and Ergonomic Standards
- From Tape Measure to Order: The CutByBEES Advantage
The Golden Rules of Precision Kitchen Measurement
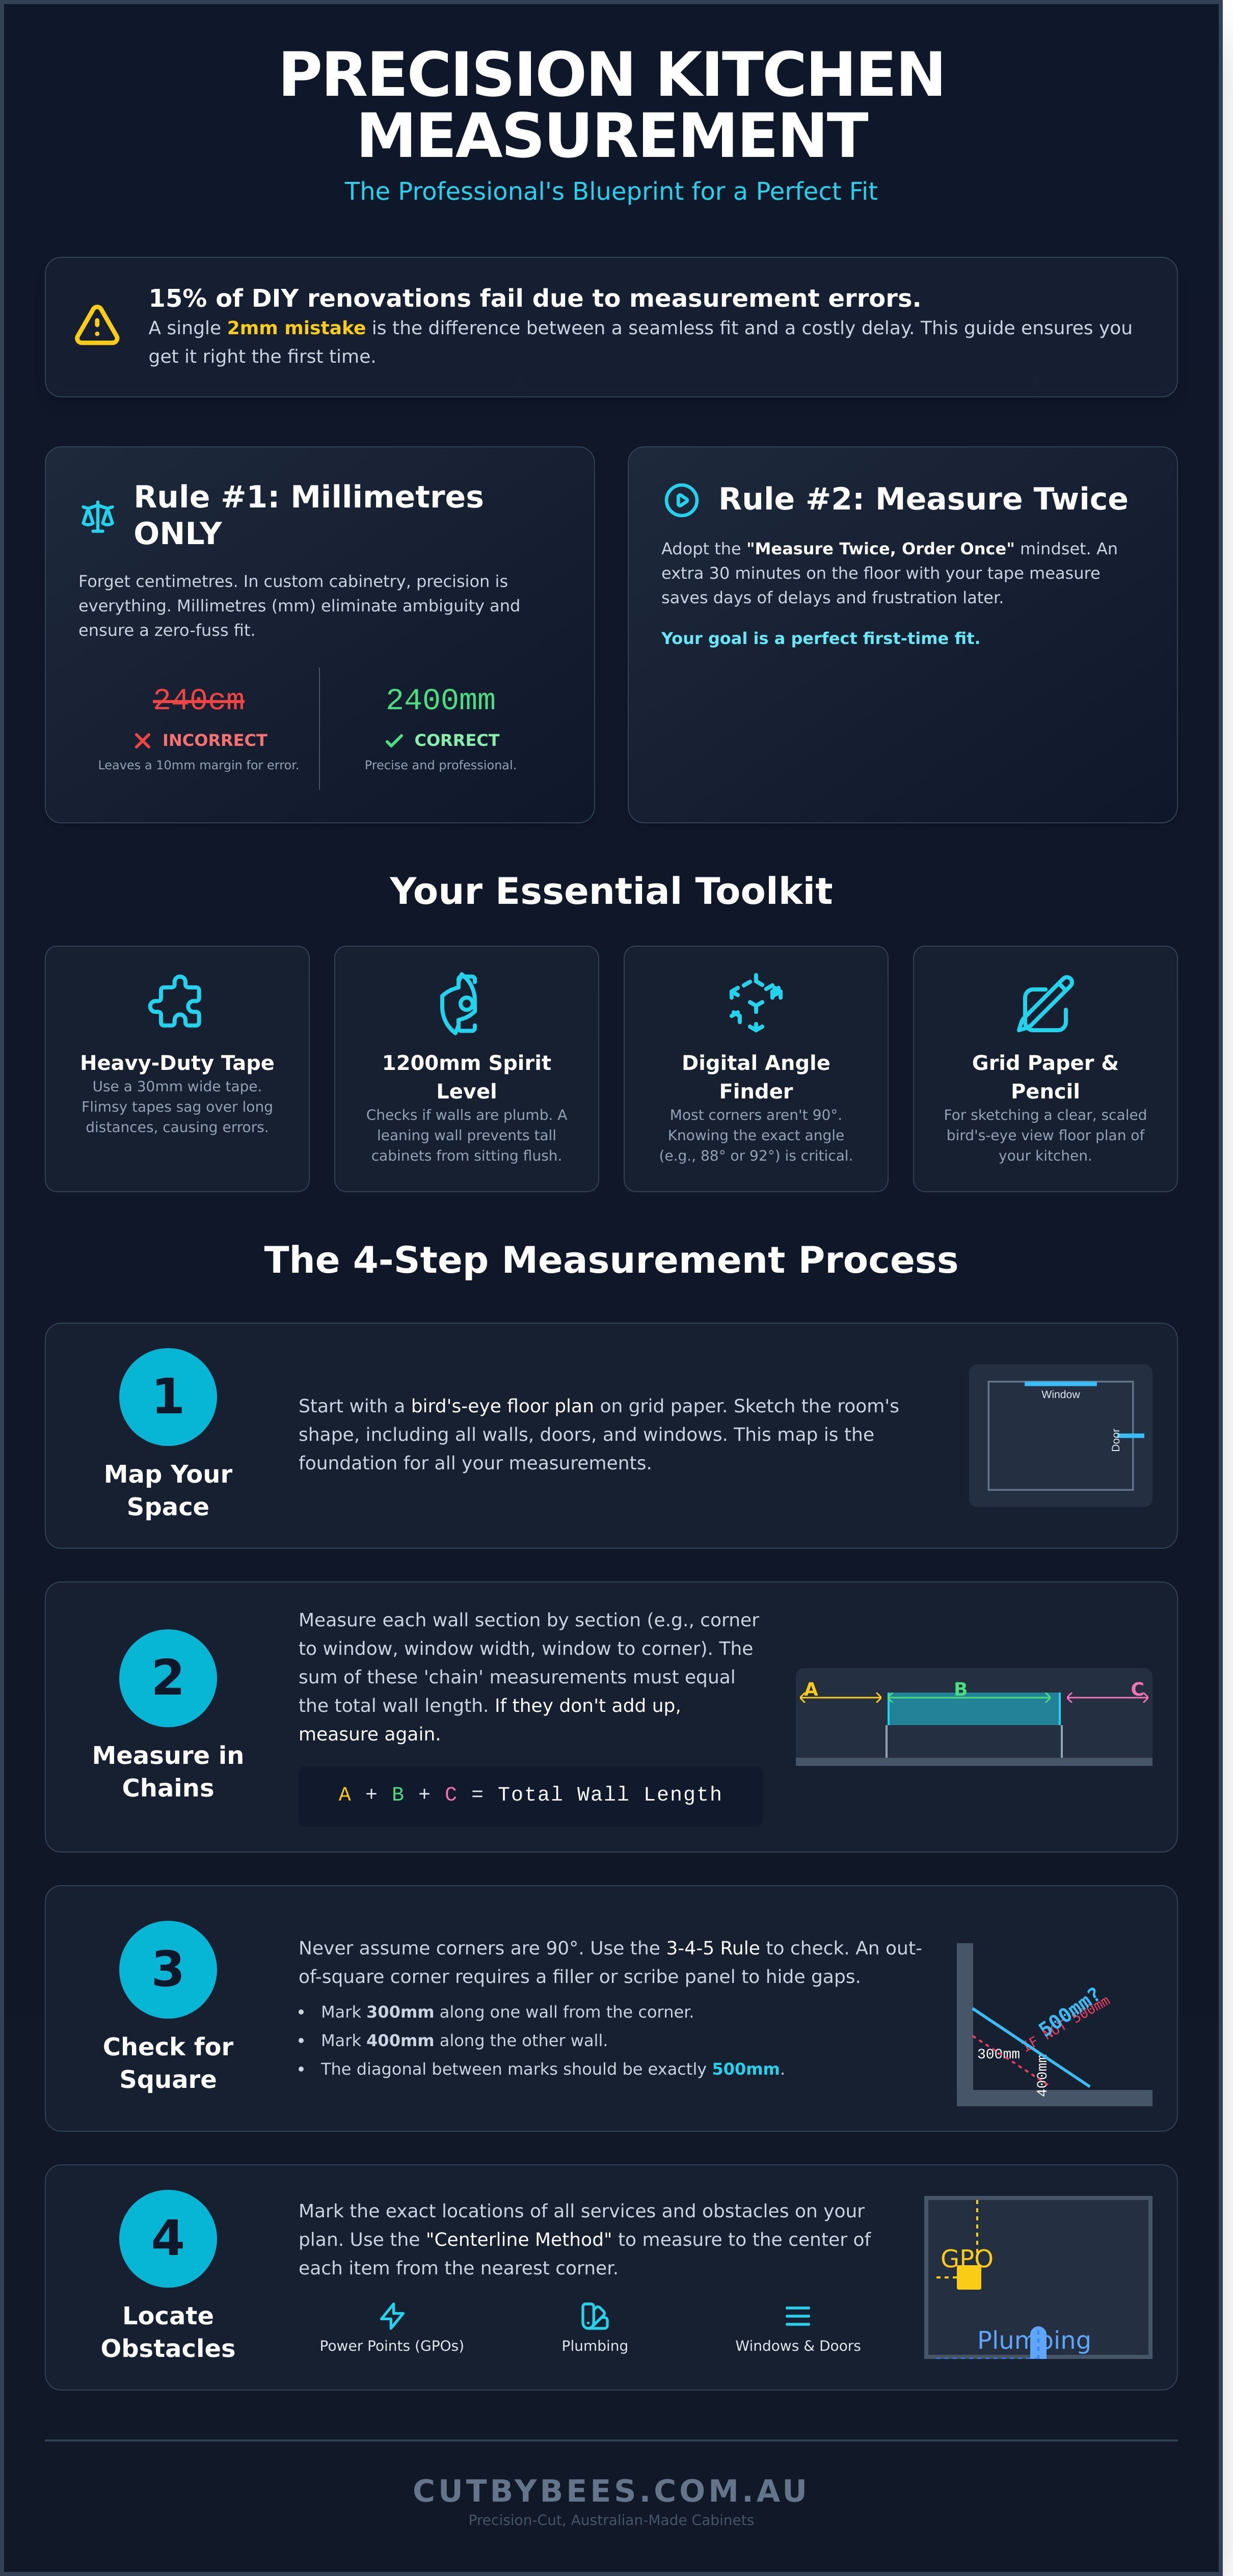
Precision is the difference between a professional finish and a DIY disaster. When learning how to measure for new kitchen cabinets, you must think in millimetres. Forget centimetres. Forget inches. In the world of custom cabinetry, a 2mm error is enough to ruin a run of units. We work to exact tolerances to ensure your flat packs fit perfectly. Your measurements must reflect that same level of detail. If you provide a measurement of 240cm, you’re leaving a 10mm margin for error. That doesn’t work here. Use 2400mm instead.
Adopt the “Measure Twice, Order Once” mindset. It’s the only way to avoid the frustration of a cabinet that arrives 5mm too wide for your alcove. At CutByBEES, we provide a 24-Hour Rework Guarantee for peace of mind, but your goal is a first-time fit. Spend 30 minutes extra on the floor with your tape measure now. It saves you three days of delays later. This isn’t about being fast; it’s about being right.
Distinguish between your wall-to-wall dimensions and your actual cabinet sizes. Wall-to-wall is the total distance between two fixed points, like two corners or a corner and a door frame. Cabinet-to-cabinet refers to the actual footprint of the units themselves. You must account for “scribes” or filler pieces. These small gaps allow for walls that aren’t perfectly square. While standard cabinet dimensions usually follow 600mm or 900mm increments, your room rarely matches these perfectly. Custom flat packs allow you to bridge that gap without using ugly 50mm fillers common in big-box retailers.
Laser measurers are excellent for long, unobstructed runs. They give you a digital reading to the decimal point instantly. However, don’t ditch the physical tape. You need a tape measure for checking internal cabinet depths and small recesses where a laser won’t fit. Use the laser for the “big picture” and the tape for the “fine details.” This dual-check system eliminates the 1% margin of error that ruins a layout. If the two tools don’t agree, find out why before you move on.
The Essential Toolkit for DIY Measurement
A standard 19mm tape measure is too flimsy for long spans. It buckles and bends, leading to “sag” that adds 3 or 4mm to your reading. Use a 30mm wide heavy-duty tape instead. It stays rigid over 3-metre distances. A 1200mm spirit level is your best friend. Most Australian homes have walls that aren’t plumb. If your wall leans out by 10mm over its height, your tall pantry cabinet won’t sit flush. Use a digital angle finder for every corner. Most “square” corners in Aussie kitchens are actually 88 or 92 degrees. Knowing this prevents massive gaps in your corner joins.
Standardising Your Notes for Cabinet Makers
Consistency prevents manufacturing errors. Mastering how to measure for new kitchen cabinets requires a systematic approach to your paperwork. Start at the entry door and move clockwise around the room. Number every wall. Create a clear legend on your sketch. Mark “W” for windows, “D” for doors, and “P” for plumbing points. Take clear photos of every wall from a straight-on perspective. Our production team uses these photos to spot potential obstacles like GPOs or skirting boards that your tape might have missed. It’s about total transparency between your space and our factory.
Step 1: Mapping the Room Footprint and Walls
Grab a pad of 5mm grid paper and a sharp pencil. You’re building a birds-eye floor plan, which is the foundation of your entire project. Precision at this stage prevents expensive rework later. Start by sketching the general shape of the room. Don’t worry about being an artist; focus on capturing every break in the wall, every doorway, and every window. This sketch is the most critical part of learning how to measure for new kitchen cabinets because it provides the context for every individual dimension you’ll record.
Measure every wall section individually. Don’t just take a total wall-to-wall measurement. You need to record the distance from the internal corner to the outside edge of the door or window architrave. Then, measure the width of the window including the trim, and finally the distance from the other side of the window to the next corner. This “chain” of measurements should equal the total wall length. If your numbers don’t add up within 2mm, go back and find the error. Precision is the difference between a kitchen that fits and one that requires a jigsaw to “make it work.”
Aussie homes settle over time, so never assume your corners are 90 degrees. Use the 3-4-5 rule to check for squareness. Mark 300mm from the corner along one wall and 400mm along the adjacent wall. Measure the diagonal distance between these two marks. It should be exactly 500mm. If it’s 505mm or 495mm, your corner is out of square. Note this on your plan. It tells you where you’ll need “filler” or “scribe” pieces to hide gaps between the cabinet and the wall. Finally, mark the swing direction of every door. A fridge door that hits a pantry architrave is a 1,200 AUD mistake you want to avoid.
Measuring Wall Lengths with Accuracy
Walls are rarely perfectly straight. They bow and lean. To get an accurate reading, measure every wall at three distinct heights: floor level, bench height (900mm), and head height (2100mm). Always record the shortest dimension as your “true” width. If the floor width is 3005mm but the head height is 2997mm, your cabinets must fit the 2997mm gap. Remember to account for skirting boards and cornices. Most Aussie skirting is 12mm to 18mm thick; if you aren’t removing them, your cabinet run must be shorter to compensate.
Vertical Dimensions and Bulkheads
Measure from the finished floor to the ceiling in at least four different spots. A 15mm dip in a concrete slab over a 4-metre run is common in Australian builds. If you want a seamless “built-in” look with floor-to-ceiling pantry towers, you’ll need to measure for bulkheads. These are the small sections of wall that bridge the gap between the top of the cabinet and the ceiling. Once you have these vertical numbers, you can customise your cabinet heights to ensure a perfect fit without massive gaps at the top.
- Grid Paper: Use 1:20 scale where one square equals 100mm.
- Obstructions: Mark the location of light switches, power points, and manholes.
- Window Sills: Record the height from the floor to the bottom of the window sill to ensure your splashback fits.
Accuracy here saves days of frustration. If you’re unsure about a measurement, take it again. It’s better to spend an extra ten minutes with a tape measure now than to deal with a cabinet that’s 5mm too wide for the alcove.
Accounting for Services and Structural Obstacles
Precision is the difference between a kitchen that fits and a costly mistake. When learning how to measure for new kitchen cabinets, you can’t just look at the floor space. You need to map the “Centerline” for every service point. This involves measuring from the nearest corner to the exact middle of the pipe, socket, or switch. It’s a no-nonsense method that ensures your sink, dishwasher, and oven align perfectly with the cabinetry carcasses you’ve ordered.
Mark every GPO (General Power Outlet) and light switch on your wall map. Most Australian kitchens require at least two dedicated 20-amp circuits for heavy-duty appliances. If your power point is 1150mm from the finished floor level, it sits comfortably above a standard 900mm benchtop. If it’s lower, you’ll face the headache of cutting into your splashback or paying an electrician to move the socket. Gas lines are even more critical. AS/NZS 5601.1 regulations dictate specific clearances; usually 200mm from the burner’s edge to any vertical surface. If you miss this by even 5mm, your installation won’t pass inspection.
Locating Plumbing and Drainage
Measure from the corner to the center of the 50mm PVC waste pipe. This is your anchor point for the sink cabinet. You also need to record the height of the hot and cold water inlets. These typically sit between 550mm and 650mm from the floor. If your inlets are higher than 700mm, you’ll need to customize the cabinet back or adjust your drawer depths to avoid a collision. Many older Aussie homes feature external plumbing stacks that protrude into the room by 100mm. You must account for a “void” in the cabinet carcass to hide these pipes while keeping the cabinet faces flush and professional.
Windows and Natural Obstacles
Windows are the most common hurdle when figuring out how to measure for new kitchen cabinets accurately. Always measure the total width including the timber architrave; don’t just measure the glass. A standard 15mm architrave can stop a cabinet door from swinging fully open if you don’t plan for a filler panel. The “clearance height” from the floor to the underside of the windowsill is your most important number. If this height is less than 915mm, a standard 900mm cabinet with a 20mm stone top simply won’t fit underneath.
- Check for protrusions: Window winders and handles often stick out 40mm. This can prevent a pantry door from opening.
- Splashback alignment: The distance between the benchtop and the window sill determines your splashback height. A gap of 150mm requires a different material choice than a standard 600mm gap.
- Vertical level: Use a spirit level to check if the window frame is square. A 10mm lean over a 1200mm window will create visible gaps in your joinery.
Don’t settle for the “offshore runaround” where measurements are treated as suggestions. Every millimetre matters for a zero-fuss install. If you identify these obstacles now, you avoid the frustration of onsite modifications. We build to your exact specs, so your data needs to be spot on. Take the time to double-check the vertical height of every service point before finalizing your plan.
Bench Heights, Clearances, and Ergonomic Standards
Getting the numbers right isn’t just about making things fit. It’s about how the space feels when you’re actually cooking. If you want to know how to measure for new kitchen cabinets like a pro, you have to start with the vertical stack. Australian kitchens follow specific ergonomic standards to prevent back strain and ensure smooth movement. Precision here ensures your kitchen works for you, not against you.
The Vertical Stack: From Floor to Benchtop
Standard Aussie kitchens usually sit at a finished height of 900mm to 920mm. This total is comprised of three distinct layers. First, the kickboard typically measures 150mm. This height provides enough clearance for your toes and allows installers to level the cabinets on uneven floors. Next is the cabinet carcass, which is standard at 720mm. Finally, your benchtop thickness adds the remaining 20mm, 30mm, or 40mm. If you’re taller than 185cm, consider increasing the carcass height. Custom cabinets allow you to ditch the “one size fits all” approach of mass retailers.
The “Golden Triangle” remains the backbone of efficient design. This is the path between your cooktop, sink, and fridge. Each side of the triangle should measure between 1.2m and 2.7m. If the total distance of all three sides exceeds 7.9m, you’ll spend more time walking than cooking. For busy households, walkway clearance is the most critical measurement. Aim for 1200mm between opposing benches. This allows two people to work simultaneously without bumping into each other. A minimum of 1000mm is acceptable for single-user kitchens, but anything less will feel cramped and hinder appliance door swings.
Appliance Cavity Clearances
Appliances need room to breathe. Don’t measure the fridge and build a box that fits it exactly. Most manufacturers require a 20mm to 50mm “Air Gap” on the sides and top for ventilation. Check your specific model’s manual before finalizing your cabinet order. For dishwashers, the standard opening is 600mm wide. If you’re using an integrated panel, the cabinet width must match the appliance specifications to the millimetre. Wall ovens require even more precision. The internal carcass width must align perfectly with the oven’s mounting flanges, usually requiring a 560mm to 570mm internal opening for a standard 600mm unit.
- Kickboards: 150mm standard height for toe clearance.
- Walkways: 1200mm for high-traffic zones.
- Fridge Gaps: Minimum 20mm per side for cooling efficiency.
- Benchtop: 900mm total height suits 85% of the population.
Precision is the difference between a DIY look and a professional finish. Learning how to measure for new kitchen cabinets means accounting for every millimetre of clearance before you start cutting. Once you have these clearances locked in, you can move to the ordering phase with confidence. You don’t need to settle for flat-pack limitations when local, custom-cut solutions are available.
Customise your cabinet dimensions with our precision online ordering tool.
From Tape Measure to Order: The CutByBEES Advantage
You’ve finished the manual labour of stretching the tape and marking your floors. Now comes the part where most DIY projects stall: trying to fit your unique room dimensions into the rigid, pre-set boxes of a big-box retailer. When you learn how to measure for new kitchen cabinets, you quickly realize that Australian homes rarely follow “standard” increments. A gap of 22mm might not seem like much on paper, but in a finished kitchen, it’s an eyesore that requires awkward filler strips. At CutByBEES, we don’t ask you to compromise your design to fit our stock. We cut our board to fit your walls.
Our system bridges the gap between your paper sketch and a professional finish. By choosing cut-to-size cabinets, you eliminate the “IKEA struggle” of trying to math your way out of a 2435mm wall with 600mm cabinets. We provide 100% Australian-sourced materials, meaning every carcass and door is built from high-moisture resistant (HMR) board designed for local conditions. Since our factory floor uses precision CNC technology, the measurements you enter are the exact measurements you receive, down to a single millimetre. This isn’t just about fit; it’s about the structural integrity that comes from a kitchen designed for the specific footprint of your home.
Ordering Your Custom Flat Pack Online
Moving your data into our online ordering system is a zero-fuss process. You don’t need to be a CAD expert to get a professional result. Simply select your cabinet type, whether it’s a standard base, a corner pantry, or an overhead unit, and input your specific height, width, and depth. This is where your knowledge of how to measure for new kitchen cabinets pays off. Our interface updates in real-time, allowing you to see exactly how your custom dimensions affect the final product.
- Precision CNC Cutting: Your data goes directly from the screen to our machines, removing the risk of human transcription errors.
- Premium Finishes: Choose from the full range of Polytec and Laminex colours. These aren’t cheap imports; they are the same high-durability surfaces used in A$50,000 architectural fit-outs.
- Instant Pricing: No waiting three days for a quote. As you adjust your millimetres, the price updates instantly in AUD.
Trade vs. DIY: Support for Your Project
We’ve built our reputation on being the “secret weapon” for Brisbane builders, but we provide that same professional-grade support to DIY homeowners. About 92% of our trade partners cite our speed as their primary reason for switching from traditional suppliers. If you’re a DIYer, you get access to that same industrial efficiency. We provide comprehensive installation guides and video tutorials that turn a pile of flat-pack panels into a structural masterpiece. You aren’t just buying wood; you’re buying a system designed to succeed.
The biggest fear in any renovation is making a mistake. That’s why we offer our 24-Hour Rework Guarantee. If you realize you’ve misread your tape measure after the cabinets arrive, we won’t leave you hanging for weeks. We prioritize reworks to ensure they are cut and ready for collection or dispatch within one business day. It’s our way of ensuring a small measurement error doesn’t derail your entire project timeline. Before you hit that submit button, run through this final checklist:
- Double-check your “Wall-to-Wall” total against the sum of your individual cabinet widths.
- Confirm you’ve subtracted the necessary 20mm to 50mm for corner voids and end panels.
- Ensure your sink and appliance cabinets align with your existing plumbing and electrical points.
- Verify that your door swings won’t hit handles or adjacent walls.
Once you’re confident, send it through. We’ll handle the precision, the quality, and the heavy lifting from there.
Stop Planning and Start Building
Stop overthinking the tape measure and start building. Mastering how to measure for new kitchen cabinets is simply about following the grid and accounting for every pipe, power point, and skirting board. You’ve done the hard work of mapping your footprint and checking those ergonomic clearances. Now, leave the heavy lifting to our workshop. We don’t do offshore runarounds or flimsy, mass-produced imports. Every cabinet we produce uses 100% Australian sourced substrates and precision CNC cutting for millimetre accuracy. This level of precision means your installation will be faster and cleaner than any standard off-the-shelf alternative from a corporate retailer.
If you happen to make a mistake on your measurements, don’t sweat it. Our 24-Hour Rework Guarantee ensures your project stays on track without the typical three-week wait for replacement parts. You’re ready to trade the frustration of fixed sizes for a custom kitchen that actually fits your home’s unique dimensions. It’s time to get your project off the paper and into your kitchen.
Create your DIY account and start your custom cabinet order today
Frequently Asked Questions
How do I measure a kitchen corner that isn’t 90 degrees?
Use a digital angle finder or the 3-4-5 method to determine the exact degree of the wall. Measure 600mm from the corner along one wall and 800mm along the other; the diagonal distance between these two points should be exactly 1000mm if the corner is square. If your measurement differs by more than 5mm, you’ll need to use a filler panel or scribe the cabinet to the wall. This ensures your custom cabinets sit flush without leaving unsightly gaps against the plaster.
Should I measure before or after I remove my old kitchen cabinets?
Measure after you’ve stripped the room back to the bare walls to get the most accurate results. Existing cabinets and splashbacks often hide wall bows or plumbing stacks that can change your dimensions by 10mm or more. If you must measure while the old kitchen is still in place, subtract the thickness of tiles and skirting boards from your totals. Learning how to measure for new kitchen cabinets is much more reliable when you can see the actual wall studs and floor levels.
How much clearance should I leave for a fridge in a custom cabinet?
Leave a minimum gap of 20mm on both sides and 30mm at the top for proper airflow. Most modern French door fridges also require at least 50mm of rear clearance to prevent the compressor from overheating and burning out. Always check your specific appliance manual, as brands like Miele or Liebherr have unique venting requirements. Failing to provide this space can reduce your fridge’s efficiency by 25% and may void your manufacturer warranty.
What is the standard height for Australian kitchen benchtops?
The standard height for an Australian kitchen benchtop is 900mm from the finished floor level. This measurement includes a 150mm kickboard, a 720mm cabinet carcass, and a 30mm stone or laminate top. Many modern Australian homes now opt for a 920mm height to better suit taller users and reduce back strain during food prep. At CutByBEES, we find that 70% of our custom orders stick to the 900mm mark to ensure standard dishwashers fit perfectly under the bench.
Do I need to account for the thickness of the cabinet doors in my measurements?
Yes, you must account for the door thickness, which usually adds 18mm to 21mm to the total depth of your units. A standard base cabinet is 560mm deep, but the total footprint becomes 580mm once the door is attached. If you’re designing a tight galley kitchen, forgetting this 20mm can make your walkway feel cramped. This small detail is vital when calculating how to measure for new kitchen cabinets so that drawers don’t hit handles on the opposite side.
What happens if my floor is uneven? How do I measure for the cabinets?
Find the highest point of your floor using a laser level and use that as your starting point. Mark a level “datum line” 900mm up from this high point across all your walls to guide your installation. You’ll then use the adjustable legs on your cabinets, which typically have 25mm of travel, to level the units across the dips. If your floor slopes more than 20mm over a 2-metre span, you’ll likely need custom-ripped kickboards to hide the varying gap at the bottom.
How do I measure for a kitchen island bench if it isn’t against a wall?
Measure from the nearest fixed walls to the four corners of your intended island footprint. You should maintain a “work zone” clearance of at least 1000mm to 1200mm between the island and your perimeter cabinets. Use masking tape to mark the 1200mm by 2400mm island outline on your floor before ordering. This lets you physically test the flow of the room and ensures you have 100% clearance for oven doors and dishwasher racks when they’re fully extended.
Can I order custom-sized cabinets if I only have a rough floor plan?
Don’t place an order based on architectural drawings or rough sketches alone. Real-world “as-built” dimensions often vary from the original blueprints by 30mm or more once the plaster and tiles are installed. We require final, on-site measurements to ensure your custom cabinets fit into the space without needing expensive on-site modifications. Taking the time to get exact millimetre measurements prevents the frustration of a cabinet being just 5mm too wide for its designated spot.
Article by
The Cut By BEES Trade Team
Custom Cabinetry Specialists & Australian Joinery Experts
The CutByBEES team brings decades of hands-on cabinetmaking and CNC manufacturing expertise to South East Queensland. Built on family-owned values and 100% locally sourced Australian substrates, we specialize in high-precision, cut-to-size flat pack cabinetry for trade professionals and DIY renovators alike. When we aren't helping builders and homeowners design custom spaces through our 3D planner, we are ensuring every order meets our strict precision standards and 24-Hour Rework Guarantee.
Disclaimer
Disclaimer & Legal Notice:
The information provided in this article is for general informational and educational purposes only. While CutByBEES provides 100% custom cut-to-size flat pack cabinetry and materials based on customer-submitted specifications, final measurement accuracy, structural site preparation, and proper installation remain the sole responsibility of the purchaser or installer.
Always ensure trade tasks—including electrical wiring, plumbing, and major structural modifications—are performed by licensed Australian trade professionals in compliance with local Queensland building codes. References to third-party suppliers, hardware, or substrate manufacturers (such as Polytec, Laminex, Blum, Nikpol, Wilson & Bradley, and Lincoln Sentry) are for material identification and compatibility purposes. For specific terms regarding our 24-Hour Rework Guarantee and warranty coverage, please refer to our official CutByBEES Terms & Conditions.