
How to Ensure Accurate Cabinet Measurements for Custom Flat Packs
23 May 2026
A single millimetre error on your floor plan can turn a dream renovation into a costly disaster. With the average Australian kitchen renovation costing $30,000, knowing how to ensure accurate cabinet measurements is your best insurance policy. You might be staring at a blank room or a wonky wall and wondering if your tape measure is even telling the truth. It’s a valid fear. Nobody wants to waste money on cabinets that don’t fit or rely on bulky fillers to hide avoidable gaps.
We know the pressure of getting it right. This guide teaches you the exact no-nonsense techniques professionals use to handle real-world site conditions. You will learn how to account for unlevel floors and out-of-plumb corners so your custom order is millimetre-perfect. We provide a clear, foolproof checklist that gives you the confidence to order your custom flat pack cabinets online and achieve a high-end finish that fits your space exactly.
Key Takeaways
- Understand why custom flat packs require millimetre-perfect precision to avoid the need for unsightly fillers or gaps.
- Identify the professional tools required for the job, including when to trust a laser measurer versus a traditional steel tape.
- Learn the exact process for how to ensure accurate cabinet measurements by recording the width and height of your void at multiple points.
- Discover how to correctly map out existing plumbing, power points, and unlevel floors to prevent installation conflicts.
- Gain the confidence to convert your site sketches into a final, error-free online order for custom-cut cabinetry.
Table of Contents
- Why Millimetre-Perfect Accuracy Matters for Custom Flat Packs
- Essential Tools and Preparation for Cabinet Measuring
- The Step-by-Step Guide to Measuring Your Cabinetry Void
- Accounting for Real-World Obstacles: Walls, Floors, and Services
- Finalising Your Measurements for a Flawless CutByBEES Order
Why Millimetre-Perfect Accuracy Matters for Custom Flat Packs
Accuracy isn’t a suggestion in cabinetry; it’s the law of the land. When you order custom flat packs, the machines cut exactly what you tell them. There is no middle ground. If your measurement is out by a few millimetres, the cabinet simply won’t fit the void. Learning how to ensure accurate cabinet measurements is the difference between a professional finish and a DIY disaster. The age-old “measure twice, cut once” mantra exists for a reason. It is the foundation of every successful renovation.
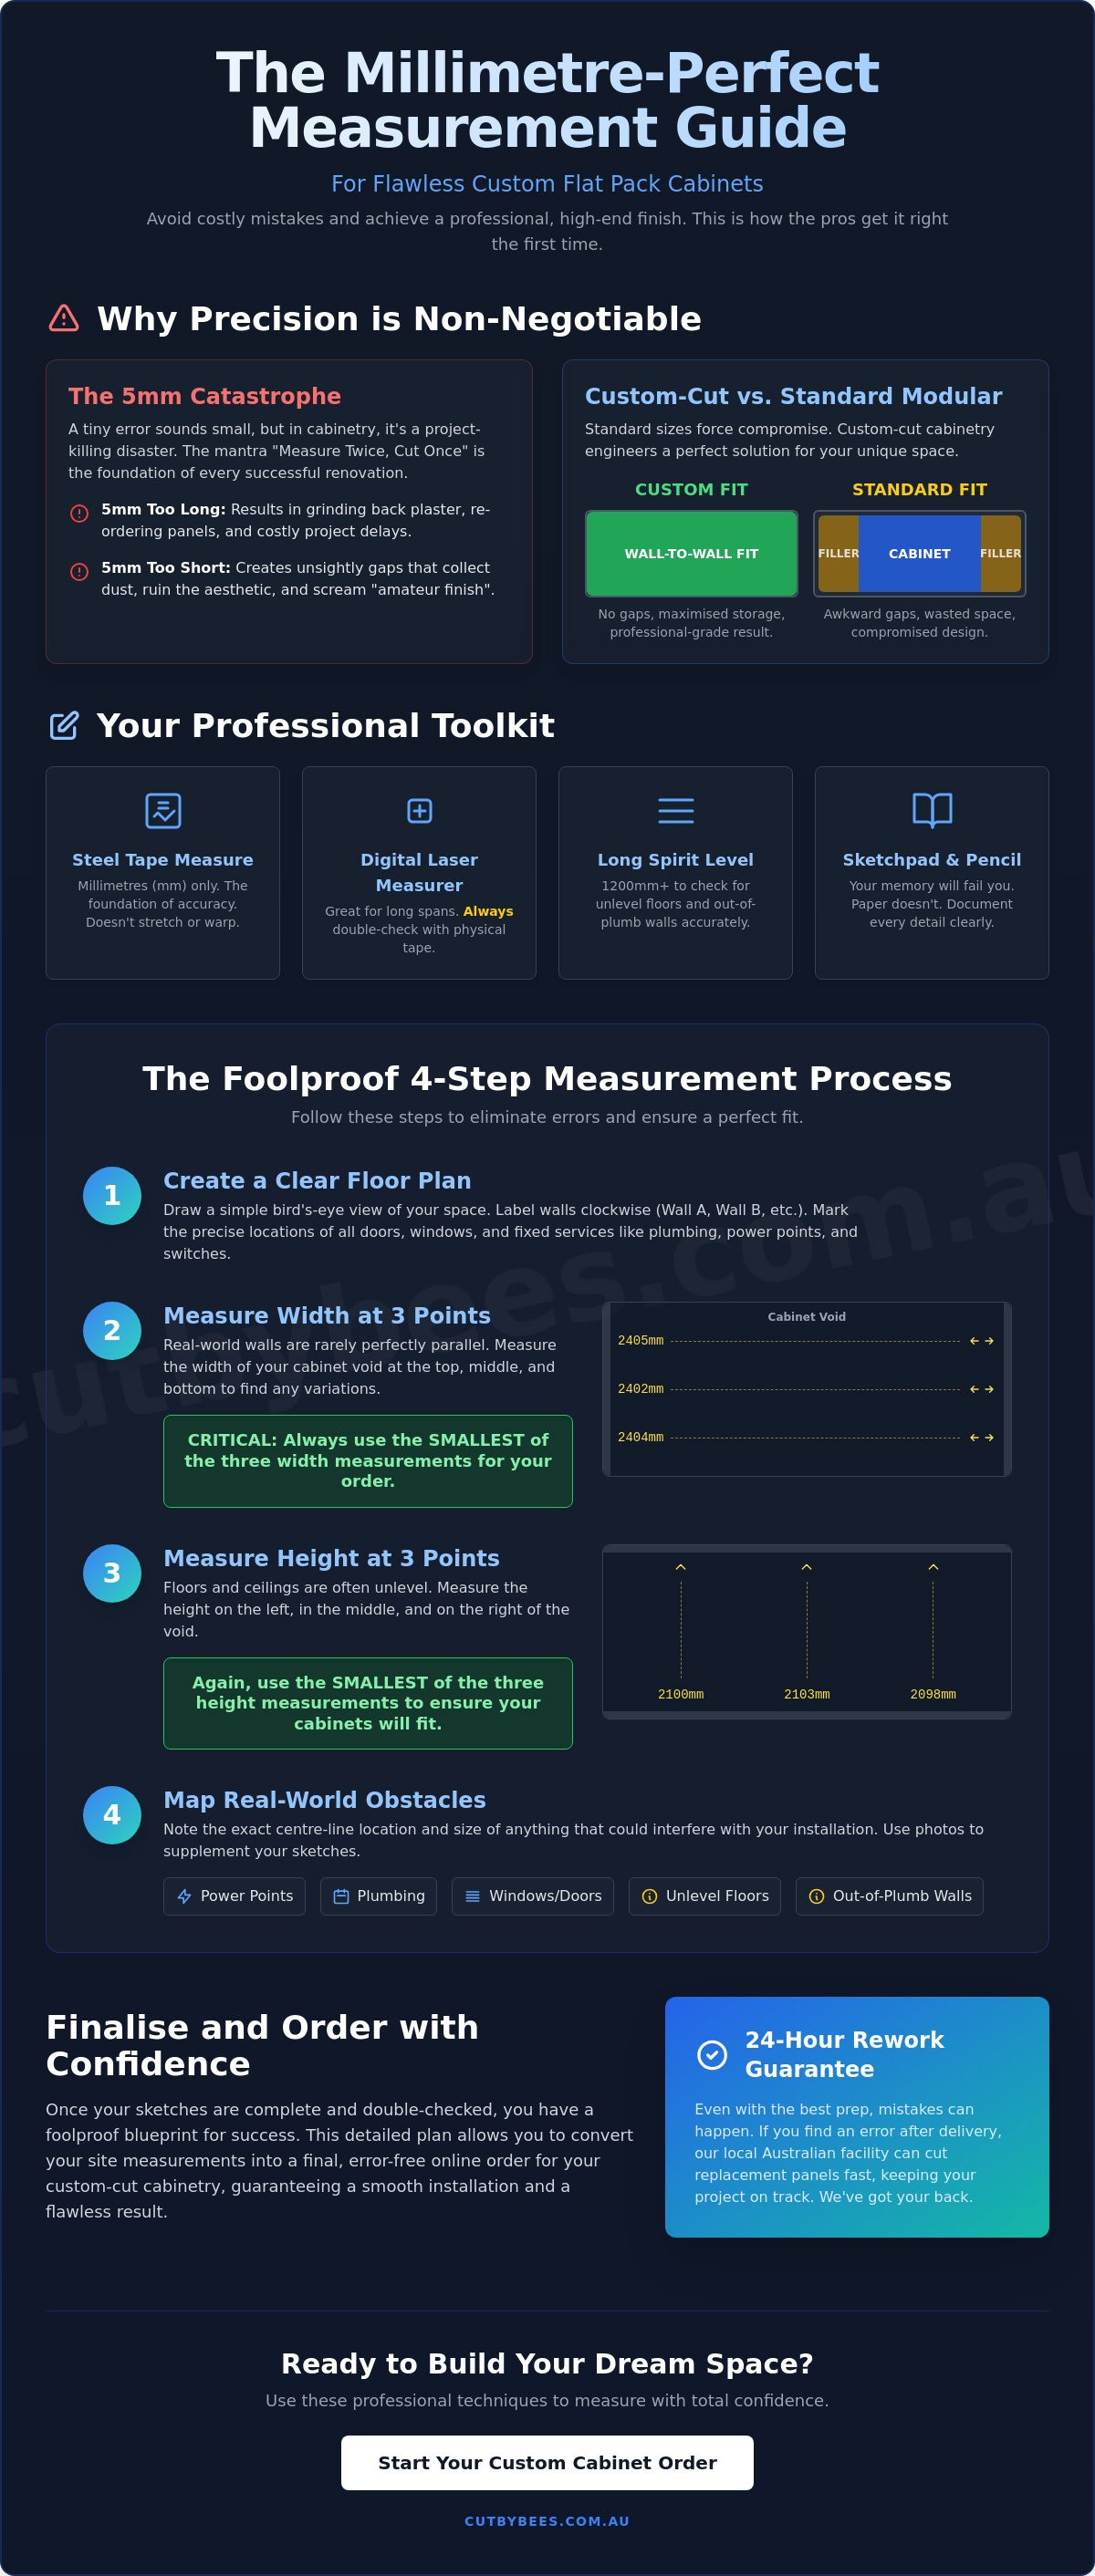
A 5mm error sounds small. In reality, it’s often a catastrophic failure. If your wall-to-wall run is 5mm too long, you are left grinding back plaster or re-ordering panels. If it’s 5mm too short, you have a visible gap that collects dust and looks amateur. Getting it right the first time saves you the stress, the downtime, and the extra cost of replacement parts. Precision pays for itself. Every pro knows that a reliable tape measure is the most important tool in the kit. It allows you to document the reality of your space rather than what the builder’s plan claims it should be.
Custom-Cut vs. Standard Modular Sizes
Standard modular cabinets from big-box retailers force you to compromise. They only come in set widths, which usually results in awkward gaps that you have to cover with filler panels. These panels are dust magnets and look like an afterthought. Custom-cut cabinets allow for a true wall-to-wall fit. You can maximise every centimetre of storage in your kitchen or laundry. This level of precision delivers a professional-grade result that makes your DIY project look like a high-end designer install. You aren’t just filling a room; you are engineering a solution that fits your home perfectly.
The CutByBEES 24-Hour Rework Guarantee
Even with the best preparation, mistakes can happen. We provide a 24-hour rework guarantee to give you total peace of mind. If you realise a measurement was wrong after the order arrives, we don’t leave you hanging. Our local Australian manufacturing facility can cut replacement panels fast. We don’t rely on overseas shipping or complex supply chains. We prioritise technical accuracy in our facility to match your specs exactly. This local support is a massive advantage over imported stock cabinets. It keeps your renovation moving forward without the frustration of long wait times or impersonal customer service centres.
Essential Tools and Preparation for Cabinet Measuring
You cannot achieve millimetre precision with a flimsy plastic ruler or a soft tailor’s tape. Professional results require professional gear. If you want to know how to ensure accurate cabinet measurements, start by investing in a high-quality steel tape measure. Steel tapes don’t stretch or warp. In Australia, we work exclusively in millimetres. Avoid tapes that display imperial units; they only increase the risk of a conversion error that could ruin your entire order. Every millimetre counts when you are fitting cabinetry into a tight void.
The Professional Toolkit for DIYers
You don’t need a van full of power tools to measure a room, but you do need the right basics. A sharp pencil is better than a pen because you can mark exactly where a measurement ends. Consider using a laser level to project a consistent datum line around the room. This helps you identify high and low spots in the floor before you commit to your layout. Use your smartphone to document everything. Take photos of where the plumbing enters the wall and where electrical points are located. These visual cues are invaluable when you sit down to design your custom flat pack cabinets online.
Preparing Your Sketch and Floor Plan
Start with a clear bird’s-eye view of the space. Don’t worry about being an artist; focus on clarity. Label your walls clockwise as Wall A, Wall B, and so on. This system ensures you don’t mix up your measurements later. Mark every opening, including doors and windows, and note which way they swing. Identify fixed points like the centre of the sink waste or the position of the oven power point. Having this structured plan is the first step in how to ensure accurate cabinet measurements before you even pull your tape out of its housing. It turns a chaotic room into a manageable set of data points.
The Step-by-Step Guide to Measuring Your Cabinetry Void
Measuring existing cabinets is a common mistake. If you want to know how to ensure accurate cabinet measurements, you must focus on the “Void.” This is the raw, empty space where your new cabinetry will live. Measuring old units only replicates old errors and ignores the reality of your walls and floors. You are engineering a new solution, so you need to document the space as it exists right now. Treat the room as a blank canvas, even if the old kitchen is still in place. Clear the clutter and get your tape measure directly against the plaster or masonry.
Accuracy starts with identifying your fixed boundaries. These are the points that won’t move, such as a corner, a window frame, or a doorway. Once you define these limits, you can begin the process of mapping the three dimensions: width, height, and depth. Don’t rush this stage. A few minutes of extra care here prevents hours of frustration during the installation. Your goal is a millimetre-perfect fit that requires zero filler panels or messy adjustments on site.
Measuring Width: The Three-Point Rule
Walls in Australian homes are rarely perfectly parallel. Whether it’s a new build or a heritage renovation, walls bow, lean, and curve. To handle this, you must measure the width of your cabinetry run at three different heights: 100mm off the floor, in the middle (around 900mm), and at the top (around 2100mm). This is the three-point rule. It reveals if the wall is “closing in” at any point. Crucially, you must always use the smallest measurement of the three for your cabinet width. If the wall is 2405mm at the floor but only 2400mm at the top, your cabinets must be sized for 2400mm. A rigid cabinet box will not shrink to fit a narrow gap.
Measuring Height and Depth
Height measurements must account for the finished floor level (FFL). If your floor is unlevel, find the highest point using your spirit level and measure up from there. This ensures your kickboards have enough room to be trimmed to fit the slope. For depth, base cabinets are typically designed between 560mm and 580mm deep. This allows for a standard 600mm benchtop with a 20mm to 40mm overhang. Wall cabinets are shallower, usually 300mm to 350mm, to prevent them from feeling overbearing while you work at the bench. Always check your appliance specifications before finalizing depths. A modern fridge or a deep dishwasher may require extra clearance behind the cabinetry to sit flush with your new doors.
Accounting for Real-World Obstacles: Walls, Floors, and Services
Buildings aren’t built like Swiss watches. Over time, slabs settle and timber frames warp. When you are learning how to ensure accurate cabinet measurements, you have to look for the hidden traps that a simple floor measurement might miss. You are measuring for a rigid object that will be installed into a flexible, often “wonky” environment. Identifying these obstacles now prevents you from having to modify your cabinets with a circular saw on the day of installation. Focus on the fixed points that dictate where a cabinet can and cannot go.
Start with your services. To locate plumbing and electrical points accurately, always measure to the centre of the fixture. Don’t just measure to the edge of a pipe or a power point plate. Measure from your nearest reference wall to the exact centre of the sink waste or the dishwasher tap. Do the same for light switches and GPOs. This gives you a clear target for any cut-outs required in the cabinet backs or ends. Also, pay close attention to door and window architraves. A cabinet door that sits too close to a door frame might hit the timber trim when it opens. Always measure to the outside edge of the architrave, not just the opening itself.
Dealing with “Wonky” Walls and Floors
Use your 1200mm spirit level to check every surface. If the floor drops 10mm across a two-metre run, you need to know this before you set your cabinet heights. Never assume a corner is a perfect 90-degree angle. If the corner is “tight” (less than 90 degrees), your cabinets will bind and leave a gap at the front. We recommend the “Scribe” technique to handle this. When you order your custom flat pack cabinets, we can provide end panels with a 20mm buffer. This extra material allows you to trim the edge to follow the exact curve or lean of your wall for a seamless, professional finish.
Mapping Services and Appliances
Appliances have very specific requirements that dictate your cabinetry dimensions. Measure to the outside edge of window frames to ensure your overhead cabinets don’t overlap the trim. If you have an existing bulkhead, measure the height from the floor to the underside of the bulkhead at multiple points. For appliances like fridges and ovens, check the manufacturer’s spec sheet for “breathing space.” Most modern refrigerators require a 5-10mm gap on all sides to prevent overheating and to allow the doors to swing freely. Recording these details is a vital part of how to ensure accurate cabinet measurements that actually work in a real-world kitchen or laundry.
Finalising Your Measurements for a Flawless CutByBEES Order
You have done the hard work on-site. Your sketch is full of data points and your walls are mapped. Now you need to translate those physical dimensions into a digital order. This is the final, critical step in how to ensure accurate cabinet measurements. Our online ordering system is a precision tool. It communicates directly with our CNC machinery in Brisbane. If the data you enter is correct, the result will be millimetre-perfect. If you rush this stage, you risk the integrity of the entire installation.
Every measurement must be converted to millimetres (mm). We do not accept centimetres or metres because they increase the risk of decimal point errors. If your tape measure shows 1.2 metres, you must enter 1200. This standardisation is how professionals avoid ambiguity. While you are in the portal, you will also select your materials. We use high-quality Australian-sourced substrates, including E0 and E1 low-emission boards. These materials meet the AS/NZS 1859.2:2004 standards, ensuring your cabinetry is durable and safe for indoor air quality. We use 16mm solid back panels for structural integrity, which is essential if you plan to install heavy stone benchtops later.
The Final Checklist Before Ordering
Before you hit the submit button, run through this no-nonsense checklist. It is your last line of defence against ordering errors. Do not skip these steps. Even experienced tradespeople double-check their figures before committing to a custom cut.
- Subtract Tolerances: Never order a cabinet that is the exact size of the void. Subtract 1-2mm from the total width to allow for “fitting room.” This prevents the cabinet from binding against the walls.
- Appliance Clearances: Open your appliance spec sheets one last time. Ensure the internal carcass dimensions provide the 5-10mm of breathing space required for heat dissipation.
- Account Type: Ensure your account is correctly set to “Trade” or “DIY.” This ensures you receive the correct pricing and service level tailored to your technical expertise.
- Verify the Sketch: Read every number off your screen and find the corresponding mark on your paper sketch. If a number looks “round” (like 600) but your sketch says 598, trust your sketch.
Ready to Start? Your Custom Cabinets Are a Click Away
You now have the professional techniques required for how to ensure accurate cabinet measurements. You have accounted for wonky walls, mapped your plumbing, and checked your floor levels. The uncertainty is gone. You can now place your order with total confidence, knowing that your cabinetry will arrive exactly as specified. We manufacture everything locally in our Brisbane facility and offer fast Australia-wide delivery to keep your project on schedule. There are no administrative delays or outsourced communication. You deal directly with the experts who cut your panels. Start your custom flat pack order today and get the professional finish your home deserves.
Start Your Flawless Cabinetry Project Today
You have the professional techniques required to map your space with total precision. From identifying wonky walls to locating service centres, you now have a foolproof plan for success. Remember that excellence starts with a quality steel tape and ends with a meticulous site diary. By measuring the cabinetry void at three different heights and accounting for floor slopes, you’ve learned exactly how to ensure accurate cabinet measurements for a high-end finish.
It’s time to turn those sketches into a reality. We manufacture everything in our Brisbane facility using 100% Australian sourced materials. Our fast Australia-wide delivery keeps your renovation moving, while our 24-hour rework guarantee provides the ultimate safety net. You don’t have to settle for standard sizes or awkward filler panels anymore. Take control of your renovation and get the millimetre-perfect results you deserve. Order your custom-cut flat pack cabinets now and experience the difference of local expertise.
Frequently Asked Questions
Should I measure in centimetres or millimetres?
Always use millimetres (mm) for every measurement. This is the absolute standard for the Australian cabinetry industry and our online ordering system. Using millimetres eliminates the risk of decimal point errors that often occur when using centimetres or metres. If you want to know how to ensure accurate cabinet measurements, stick to mm to keep your data consistent with professional trade standards and CNC machinery requirements.
What do I do if my walls are not square?
Measure the width at the top, middle, and bottom of the wall and use the smallest figure as your guide. This ensures the rigid cabinet box actually fits into the space without binding. You can then use a scribe or filler panel to close any visible gaps caused by the wall leaning away. Never try to force a square cabinet into a tight, out-of-square gap; it simply won’t work.
Do I need to account for the thickness of the cabinet material?
You only need to provide the external dimensions of the cabinetry void. Our engineering system automatically calculates the internal clearances and panel deductions based on the 16mm solid board thickness we use for our carcasses. Focus on the total space available in your room. We handle the technical construction details to ensure the final product matches your specified exterior size exactly.
How much gap should I leave between the cabinet and the wall?
Leave a 1-2mm tolerance on each side of your total cabinetry run. This “fitting room” is vital for sliding the units into place without scratching your plasterwork or damaging the panels. If your total wall-to-wall void is 2400mm, ordering a run that totals 2396mm or 2397mm wide gives you the necessary breathing space for a smooth, stress-free installation process.
Should I measure before or after the flooring is installed?
Measure after the finished flooring is installed to ensure total vertical accuracy. If you must measure before the floor is down, you need the exact millimetre thickness of your planned flooring, including glue, grout, or underlay. Standard Australian benchtop heights are 900-920mm from the finished floor level. An error in floor height calculation will throw off your kickboard heights and appliance clearances.
What is a “scribe” and do I need one for my flat pack?
A scribe is an additional piece of matching material used to hide gaps between a cabinet and an uneven wall. You trim this piece on-site with a jigsaw or planer to follow the exact contour of your plaster. It’s essential for achieving a professional, gap-free look in Australian homes where walls are rarely perfectly straight. We can provide oversized end panels specifically for this purpose.
How do I measure for a corner cabinet?
Measure from the internal corner out to the end of the run on both walls. Use a large framing square to check if the corner is exactly 90 degrees. If the corner is “tight” or less than 90 degrees, you will need to pull the cabinets away from the wall slightly during installation. This prevents the cabinet doors from binding and ensures the front faces of your run remain perfectly aligned.
What happens if I make a mistake in my measurements?
Take advantage of our 24-hour rework guarantee if you discover a measurement error after your order arrives. Because we manufacture everything locally in our Brisbane facility, we can cut and dispatch replacement panels much faster than mass-market retailers. This service is a key part of how to ensure accurate cabinet measurements don’t become a project-ending disaster. We prioritise your corrections to keep your renovation on schedule.
Article by
The Cut By BEES Trade Team
Custom Cabinetry Specialists & Australian Joinery Experts
The CutByBEES team brings decades of hands-on cabinetmaking and CNC manufacturing expertise to South East Queensland. Built on family-owned values and 100% locally sourced Australian substrates, we specialize in high-precision, cut-to-size flat pack cabinetry for trade professionals and DIY renovators alike. When we aren't helping builders and homeowners design custom spaces through our 3D planner, we are ensuring every order meets our strict precision standards and 24-Hour Rework Guarantee.
Disclaimer
Disclaimer & Legal Notice:
The information provided in this article is for general informational and educational purposes only. While CutByBEES provides 100% custom cut-to-size flat pack cabinetry and materials based on customer-submitted specifications, final measurement accuracy, structural site preparation, and proper installation remain the sole responsibility of the purchaser or installer.
Always ensure trade tasks—including electrical wiring, plumbing, and major structural modifications—are performed by licensed Australian trade professionals in compliance with local Queensland building codes. References to third-party suppliers, hardware, or substrate manufacturers (such as Polytec, Laminex, Blum, Nikpol, Wilson & Bradley, and Lincoln Sentry) are for material identification and compatibility purposes. For specific terms regarding our 24-Hour Rework Guarantee and warranty coverage, please refer to our official CutByBEES Terms & Conditions.