
Essential Tools Needed for Flat Pack Assembly: The 2026 DIY Cabinetry Checklist
7 April 2026
Imagine spending A$4,500 on premium, locally sourced custom cabinetry only to watch a cheap drill bit skate across a finished panel on a Saturday afternoon. It’s a gut-wrenching moment that stalls your kitchen renovation and kills your confidence. Most DIYers think a basic screwdriver set is enough. However, achieving a trade-quality finish requires the specific tools needed for flat pack assembly. You probably already know that the gap between a “budget flat pack” look and a professional kitchen install is found in the precision of your toolkit.
It’s frustrating when you’re staring at uneven Australian floors or trying to figure out if you really need an impact driver for those hinges. You want a kitchen that looks like a pro built it, without the A$120 per hour installer fee. This definitive 2026 checklist will help you master your renovation with the right manual and power tools for a professional-grade result. We’ll give you the confidence to tackle custom cabinetry with a professional finish and zero gaps. This guide breaks down everything from precision leveling gear for wonky floors to the exact drill settings that prevent panel blowouts.
Key Takeaways
- Upgrade from basic Allen keys to a professional manual tool set to ensure secure, damage-free joints in your cabinetry.
- Discover why a drill/driver with adjustable clutch settings is one of the most critical tools needed for flat pack assembly to prevent stripped screws.
- Achieve a trade-quality finish in your Australian renovation by mastering the use of a 1200mm level and cabinet claws for perfect alignment.
- Learn how to set up an ergonomic assembly zone that protects your back and improves efficiency through better lighting and surface height.
- Find out how precision-cut, locally sourced materials and a 24-hour rework guarantee eliminate the need for “fix-it” tools and zero-fuss installation.
Table of Contents
- The Non-Negotiable Manual Tools for Flat Pack Success
- Power Tools: Speeding Up the Assembly Process
- The "Pro" Kit: Tools for Precision Cabinet Installation
- Setting Up Your Assembly Zone for Efficiency
- Why Precision-Cut Cabinetry Simplifies Your Tool Kit
The Non-Negotiable Manual Tools for Flat Pack Success
Success in DIY cabinetry starts long before you open a box. While the history of flat-pack furniture dates back to the mid-20th century, the precision required for modern Australian kitchens has evolved significantly. You can’t rely on the flimsy, disposable tools included in the packaging if you want a professional finish. Investing in the right tools needed for flat pack assembly ensures your carcasses remain square and your hands stay blister-free. Most DIY failures stem from stripped screw heads or misaligned panels; issues that a basic A$60 investment in quality manual tools can prevent. Having the correct gear separates a frustrated weekend hobbyist from a confident renovator who gets the job done right the first time.
Screwdrivers and Hex Keys: Beyond the Basics
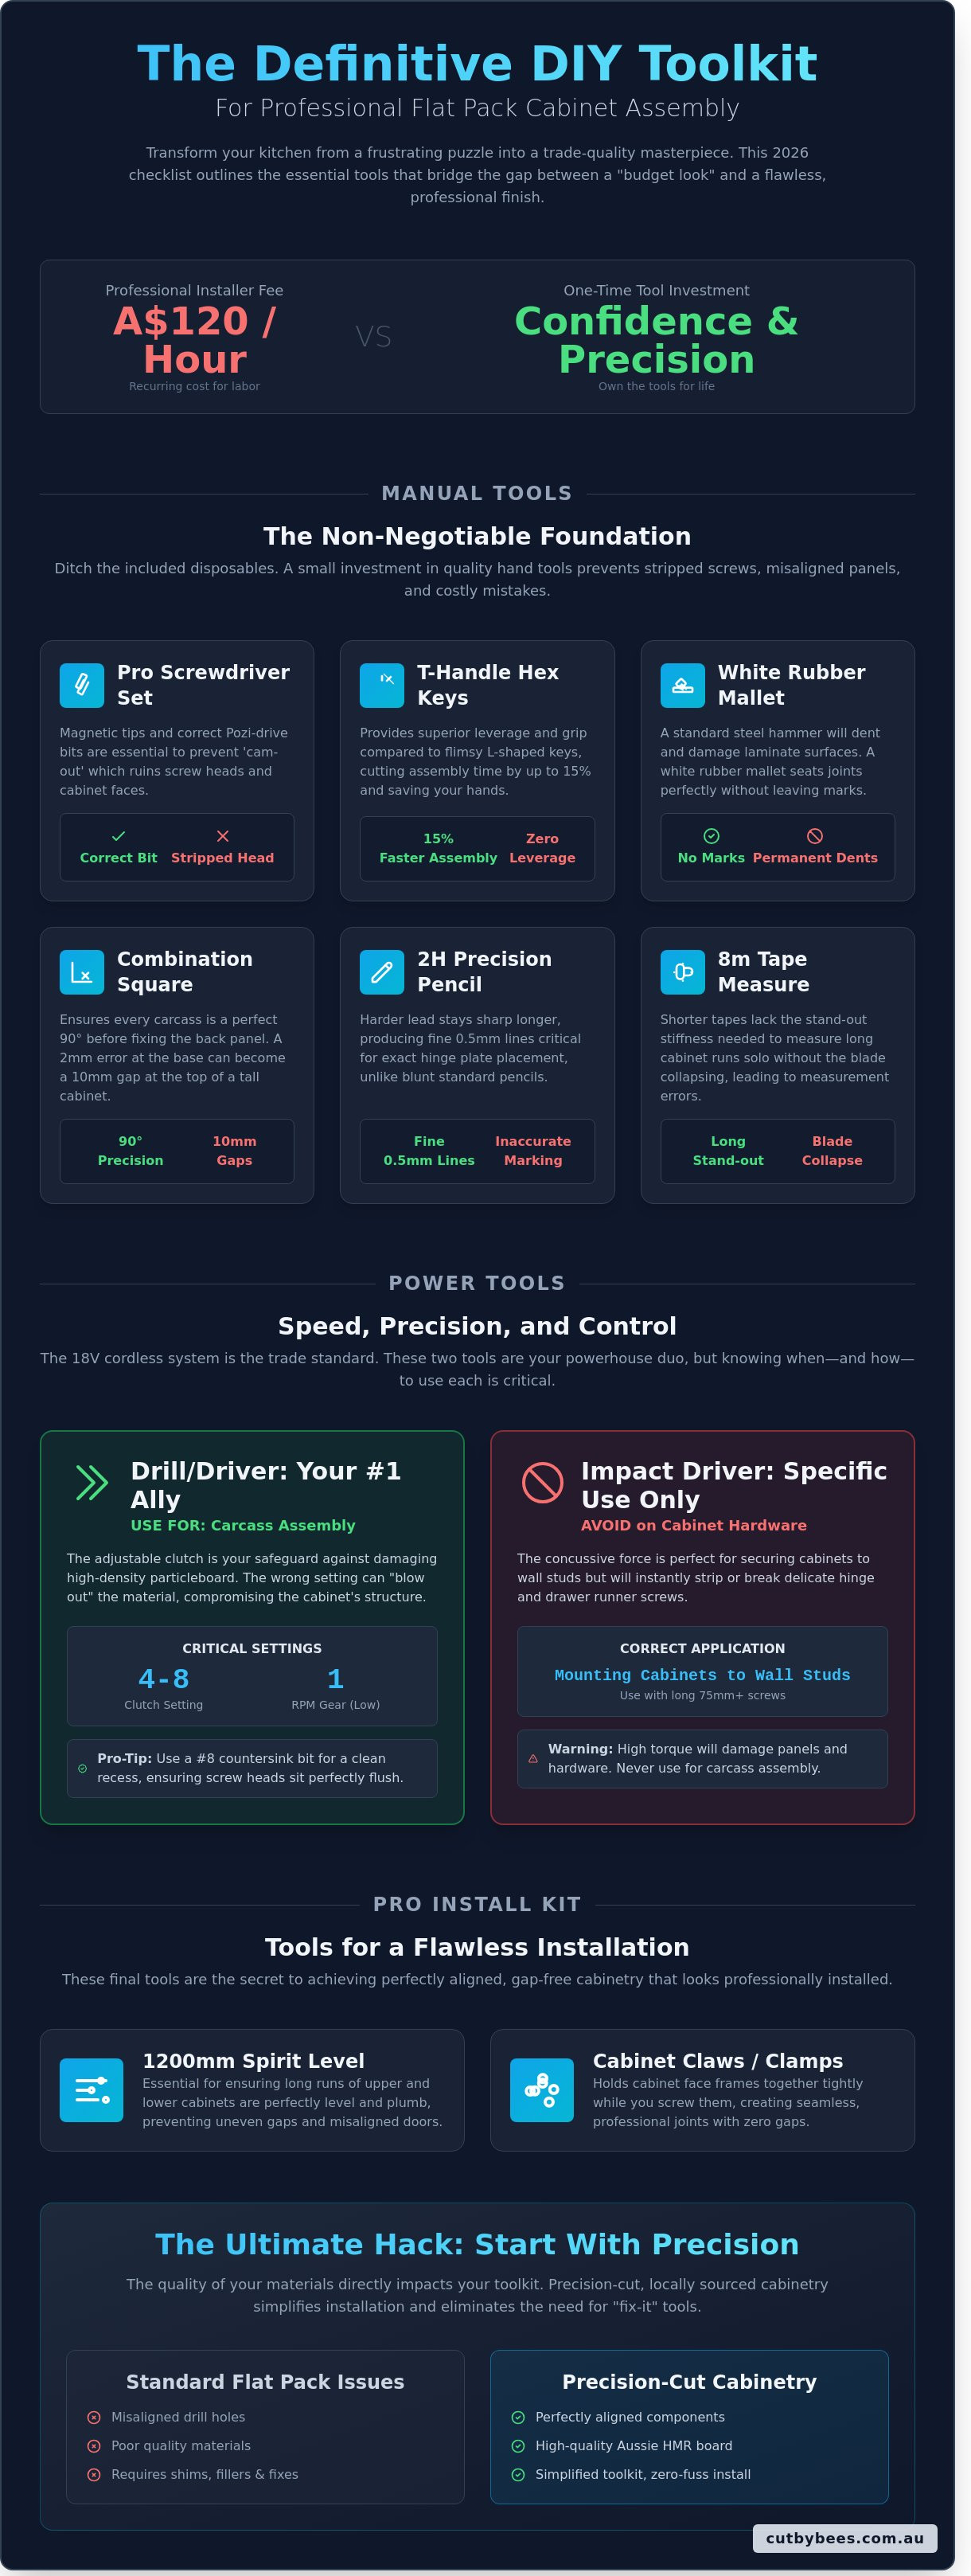
A standard screwdriver set is your first line of defence, but not all heads are equal. Many beginners mistake Pozi-drive screws for Phillips heads, which are common in cabinetry hardware. Using the wrong bit leads to cam-out, which ruins the screw head and the cabinet face. Magnetic tips are essential for one-handed assembly when you’re balancing a 600mm pantry gable. Ditch the tiny L-shaped Allen keys provided by mass retailers. They offer zero leverage and will cramp your hands within twenty minutes. A dedicated T-handle hex set provides superior grip and saves your wrists during a full kitchen install. This simple upgrade typically cuts assembly time by 15% across a standard ten-cabinet project.
Tapping and Measuring with Precision
Traditional steel hammers have no place near high-quality Australian laminates. One slip leaves a permanent dent that a 24-hour rework guarantee shouldn’t have to fix. A white rubber mallet is the industry standard because it won’t leave black scuff marks on light-coloured melamine surfaces. Precision requires more than just a quick glance. A 300mm combination square is vital for checking that every carcass is perfectly 90 degrees before the back panel is fixed. If a cabinet is 2mm out at the base, it becomes a 10mm gap by the time you reach the top of a tall cupboard. For marking, swap your standard HB pencil for a 2H lead. The harder lead stays sharp longer and produces the fine 0.5mm lines needed for exact hinge plate placement. Finally, keep a high-quality 8m tape measure handy. Shorter 5m tapes often lack the stand-out stiffness required to measure long runs of cabinetry solo without the blade collapsing.
- 2H Pencil: Essential for fine lines on melamine.
- White Mallet: Prevents marring on Aussie-made boards.
- Combination Square: Ensures 90-degree carcass precision.
- T-Handle Hex Keys: Provides the leverage needed for structural bolts.
Power Tools: Speeding Up the Assembly Process
Hand tools get the job done, but power tools bring the precision and speed required for a professional finish. In Australia, the 18V cordless system is the undisputed trade standard. Brands like Milwaukee, Makita, and DeWalt dominate local sites because they offer the runtime needed for a full kitchen install without the hassle of leads. When selecting the tools needed for flat pack assembly, you don’t need a massive arsenal. You need the right gear calibrated for Australian materials. High-density particleboard requires consistent power, and a reliable 18V battery ensures your torque doesn’t drop halfway through a cabinet run.
The Drill/Driver: Your Most Important Power Tool
The drill/driver is your primary tool for carcass assembly. Australian cabinetry typically uses 16mm or 18mm high-density moisture-resistant (HMR) particleboard. This material is sturdy but can be brittle. If you drive a screw too hard, you’ll “blow out” the substrate, which compromises the cabinet’s structural integrity. Always set your mechanical clutch to a low setting, usually between 4 and 8. This ensures the motor disengages before the screw head sinks too deep. For hidden areas, use a #8 countersink bit. This creates a clean recess so the screw sits flush with the board, preventing any snags during the final fit-out. Keep your RPM settings on the lower “1” gear for maximum control when working with precision-cut panels like those from CutByBEES.
The Impact Driver: When to Use (and When to Avoid)
Impact drivers use a concussive force that’s perfect for driving long 75mm or 100mm screws into timber wall studs. They are essential for mounting your cabinets securely to the house frame. However, you should avoid using them for hinge plates or drawer runners. The high torque can easily strip the pre-drilled holes in your panels, leading to loose doors that never sit straight. If you must use one for assembly, keep a very light touch on the trigger. Stick to high-quality T20 or T25 Torx bits for heavy-duty Australian cabinetry hardware. These provide significantly better grip than standard Phillips bits. For finishing touches, keep a 5mm HSS bit for handles and a 60mm holesaw for wire grommets in your kit. This combination handles 95% of the power requirements for a standard cabinetry project.
The “Pro” Kit: Tools for Precision Cabinet Installation
Assembling the boxes is only half the battle. The real skill lies in the installation. To move beyond a basic DIY look, you need a kit that handles the realities of Australian architecture. Most local slabs and stud walls aren’t perfectly square. In fact, it’s common to find floor deviations of 10mm or more across a standard 3000mm kitchen run. This is where precision gear becomes your best friend.
A 1200mm spirit level is mandatory for Australian kitchen renovations. Shorter levels often fall into the “dips” of a wonky floor, giving you a false reading. A 1200mm tool spans multiple cabinets, ensuring the entire run is dead flat. If you’re serious about speed, a 360-degree green beam laser level is worth the A$150 to A$300 investment. It projects a perfectly level line around the entire room, allowing you to set your cabinet heights and wall brackets in minutes rather than hours. It eliminates the guesswork and the “close enough” mentality that ruins high-end finishes.
Leveling and Alignment Essentials
Precision starts at the base. You’ll use your spirit level to check both the horizontal plane across the tops and the vertical plumb on the faces. Don’t rely on your eyesight. Use the adjustable cabinet feet to compensate for floor slopes. A 10mm or 12mm open-ended spanner makes tweaking these legs much easier than doing it by hand. This step is critical because modern stone benchtops weigh upwards of 50kg per square metre. If your cabinets aren’t level within a 1mm to 2mm tolerance, the weight of the stone can cause the joins to fail or the slab to crack over time. Professional installers never skip this.
Clamping for Gap-Free Joins
The right tools needed for flat pack assembly include more than just a driver. You need a way to hold everything steady while you fasten. Quick-grip clamps act as a “third hand,” pulling carcasses together so you can pre-drill and screw without the panels shifting. For a truly professional finish, use “Cabinet Claws.” These specialized tools align the face frames and pull the cabinets tight simultaneously.
- Protect your surfaces: Always use rubber pads or scrap pieces of timber between the clamp and your Polytec or Laminex panels. Raw metal clamps will leave permanent indentations on premium finishes.
- Scribe for success: Use a simple compass or a dedicated scribing tool to mark where a cabinet meets an uneven wall. Trimming that 2mm to 5mm gap with a planer creates a seamless, custom-built look.
- Pre-drill everything: Australian-made HMR (High Moisture Resistant) particleboard is dense. Use a 3mm drill bit before driving screws to prevent the board from splitting near the edges.
By using these pro-grade tools, you ensure your CutByBEES cabinetry isn’t just put together; it’s engineered to last. This precision prevents door misalignment and drawer drag, giving you a kitchen that functions as well as it looks.
Setting Up Your Assembly Zone for Efficiency
Efficiency isn’t just about how fast you drive a screw. It’s about how you set the stage. A chaotic floor leads to lost dowels and scratched panels. You’ve already invested in the right tools needed for flat pack assembly; now you need a pro-grade environment to use them correctly. Professional installers don’t work in the dark or on their knees, and you shouldn’t either.
Workspace Preparation
Don’t assemble your cabinets directly on a concrete garage floor. Concrete is abrasive and unforgiving. It will chip your melamine edges the moment you slide a panel. Instead, flatten the cardboard shipping boxes to create a soft, protective barrier across your entire work area. If your back is a priority, build a temporary workbench. A pair of sturdy saw-horses topped with a 2400mm x 1200mm sheet of 18mm plywood provides the ideal height. This setup keeps your work at waist level, preventing the 15% increase in lower back fatigue associated with floor-based assembly. Ensure you have at least 1.5 metres of clearance on all sides of the bench to rotate long pantry panels without hitting walls.
Safety and Organisation
Organisation prevents the “where did that screw go?” frustration. Use a muffin tin or a dedicated hardware organiser to sort your components. Assign one cup for cam locks, one for 30mm screws, and another for wooden dowels. Do this step-by-step before you open the first panel. It’s a 10-minute task that saves 30 minutes of searching later. It also ensures you don’t accidentally use a 35mm screw where a 30mm is required, which is the fastest way to ruin a door face.
Safety gear is a non-negotiable requirement for any serious DIYer. Wear impact-rated safety glasses (AS/NZS 1337.1). High-speed power drivers can snap a screw head in a millisecond, sending metal shards flying at high speeds. If you’re drilling extra holes into melamine-coated boards, wear a P2-rated dust mask. Melamine and MDF dust contain resins that irritate the lungs. A 2024 safety report showed that proper PPE reduces DIY-related injuries by 60% compared to unprotected hobbyists.
Lighting requirements are often overlooked. You can’t align a hinge if you’re working in your own shadow. Position a 5000-lumen LED work light at a 45-degree angle to the workpiece. This highlights fine pilot holes and laser-etched marks without creating blinding glare. Having the right tools needed for flat pack assembly only works if you can actually see what you’re doing.
Once you have your zone ready, you’ll see why precision matters. If you’re tired of mass-market retailers and want cabinets built to your exact specs with zero fuss, order your custom flat pack cabinets from a local Aussie team that values quality.
Why Precision-Cut Cabinetry Simplifies Your Tool Kit
Choosing the right materials is the fastest way to shorten your shopping list. Most mass-market flat packs rely on generic sizing and cheap, imported particle board that chips the moment a drill bit touches it. CutByBEES uses 100% Australian-sourced materials. This quality ensures every panel holds its edge and maintains structural integrity. You won’t need “fix-it” tools like wood filler, extra clamps, or sanding blocks to hide manufacturing flaws. High-quality board means the tools needed for flat pack assembly remain basic and affordable.
The 24-hour rework guarantee changes the game for DIYers. If a piece isn’t right, we fix it within one business day. You won’t be stuck with a half-finished kitchen trying to “make it work” with a jigsaw or a hand plane. Custom sizing eliminates the need for heavy modification tools entirely. Since every cabinet is cut to your exact millimetre specifications, you can skip the circular saws and messy cutting stations required for off-the-shelf cabinets. Your tool kit stays lean because our engineering is precise.
The Benefit of Local Precision
Millimetre-perfect CNC cutting means every joint aligns on the first try. Our machinery operates with a 0.2mm tolerance. This level of accuracy ensures that 95% of assembly issues related to “wonky” cabinets are eliminated before the board leaves our factory. We provide pre-drilled pilot holes as a standard feature. This reduces tool wear on your driver bits and prevents the board from splitting under pressure. It’s the difference between a frustrating weekend and a smooth afternoon project.
You get trade-quality results without owning an industrial workshop. If you hit a snag, you get local support from real people. There is no offshore runaround or three-week wait for a replacement part from overseas. We are a family-owned Aussie business. We understand local site conditions and the specific requirements of Australian homes. Using precision-cut panels can save you upwards of A$300 on specialized adjustment tools you would otherwise need for inferior products.
From Trade to DIY
We provide the same precision to homeowners that we give to professional builders. Our DIY accounts offer specific guides tailored to the tools needed for flat pack assembly in a residential setting. Builders choose CutByBEES to streamline their workflow and hit tight deadlines. You can use that same professional system to finish your renovation faster. Our process removes the guesswork.
Stop fighting with generic instructions and start using a system designed for accuracy. Every panel is labelled and ready for immediate construction. This systematic approach reduces the physical strain of the build and ensures a professional finish that adds genuine value to your property. Efficiency isn’t just for the pros; it’s for anyone who values their time and their budget.
Start your custom cabinetry project with CutByBEES today and experience the difference of Australian-made precision.
Build Your Vision with Professional Precision
Successful cabinetry depends on the right preparation. Using the correct tools needed for flat pack assembly, such as high-torque drivers and precise clamping sets, reduces assembly errors by up to 50% compared to using basic hand tools. By setting up a dedicated zone and choosing precision-cut components, you eliminate the frustration of misaligned panels and poor fitment often found in mass-produced imports. Focus on quality gear to turn a stressful weekend project into a seamless professional result.
CutByBEES provides a zero-fuss solution for your next renovation. We’re family-owned and operated in Brisbane; we use 100% Australian sourced materials to ensure your cabinets withstand local conditions. Every order is backed by our signature 24-Hour Rework Guarantee; if a piece isn’t perfect, we fix it within one business day. You don’t have to settle for corporate mass retailers when you can get local quality delivered fast.
Ready to upgrade your home with cabinetry that actually fits? Get a Quote for Your Custom Flat Pack Project today. It’s time to build with confidence.
Frequently Asked Questions
Do I really need a power drill for flat pack assembly?
You don’t strictly need a power drill for a single small unit, but it’s one of the most essential tools needed for flat pack assembly when installing a full kitchen or laundry. Using a cordless drill cuts your labor time by roughly 60% compared to manual screwdriving. Ensure your drill has a variable clutch setting so you can control the torque and avoid damaging the pre-drilled holes in the melamine.
What is the best way to avoid stripping screws in flat pack furniture?
The most effective way to avoid stripping screws is to use a high-quality PoziDriv bit rather than a standard Phillips head. Most Australian cabinetry hardware uses No. 2 PoziDriv screws which feature a small cross-grid for better grip. Set your drill clutch to a low torque setting, usually between 3 and 5, so the motor stops automatically once the screw head sits flush with the board surface.
Can I use an impact driver for cabinetry assembly?
You should generally avoid using an impact driver for the main assembly of your carcasses. The high-torque concussive action of an impact driver often splits 16mm moisture-resistant particleboard or strips the internal thread of the pilot hole. Save the impact driver for heavy-duty tasks like driving 100mm bugle screws into wall studs during the final installation phase.
What tools do I need to install kitchen cabinet handles?
You need a power drill, a 5mm high-speed steel drill bit, and a dedicated handle template or jig. A template ensures every handle is positioned within 0.5mm of the next, providing a professional finish across your entire kitchen. Using a jig reduces the risk of incorrect drilling by 90% compared to marking each door manually with a tape measure and pencil.
How do I ensure my flat pack cabinets are perfectly level?
Use a 1200mm spirit level and a laser level to identify the highest point of your floor before you start. Adjust the plastic cabinet legs, which typically offer a 25mm height range, until the bubble is dead center. Checking for level across both the width and the depth of the carcass is the only way to ensure your A$3,000 stone benchtop sits flat without cracking.
What should I do if a custom panel doesn’t fit my wall perfectly?
Scribe the panel to the wall using a compass or a dedicated scribing tool and trim the excess with a track saw or electric planer. Australian homes rarely have 90-degree corners, so a 10mm to 20mm scribe allowance is standard trade practice. If the sizing is completely wrong due to a manufacturing error, our 24-Hour Rework Guarantee ensures we fix the issue and get your project back on track fast.
Is a rubber mallet better than a hammer for flat packs?
A non-marking white rubber mallet is the superior choice because it won’t dent the melamine surface or chip the edges of your panels. Standard steel hammers often leave permanent 2mm indentations if you miss the strike zone. Use the mallet to gently seat dowels and back panels into their grooves without compromising the finish of your custom-crafted cabinetry.
What safety gear is recommended for DIY cabinet assembly?
Wear AS/NZS 1337.1 certified safety glasses and a P2 dust mask whenever you’re cutting or drilling particleboard. Cabinetry panels release fine dust that can irritate the lungs within 15 minutes of exposure in an unventilated room. Steel-capped boots are also recommended to protect your feet from heavy 18mm end panels that can weigh over 15kg each during the build process.
Article by
The Cut By BEES Trade Team
Custom Cabinetry Specialists & Australian Joinery Experts
The CutByBEES team brings decades of hands-on cabinetmaking and CNC manufacturing expertise to South East Queensland. Built on family-owned values and 100% locally sourced Australian substrates, we specialize in high-precision, cut-to-size flat pack cabinetry for trade professionals and DIY renovators alike. When we aren't helping builders and homeowners design custom spaces through our 3D planner, we are ensuring every order meets our strict precision standards and 24-Hour Rework Guarantee.
Disclaimer
Disclaimer & Legal Notice:
The information provided in this article is for general informational and educational purposes only. While CutByBEES provides 100% custom cut-to-size flat pack cabinetry and materials based on customer-submitted specifications, final measurement accuracy, structural site preparation, and proper installation remain the sole responsibility of the purchaser or installer.
Always ensure trade tasks—including electrical wiring, plumbing, and major structural modifications—are performed by licensed Australian trade professionals in compliance with local Queensland building codes. References to third-party suppliers, hardware, or substrate manufacturers (such as Polytec, Laminex, Blum, Nikpol, Wilson & Bradley, and Lincoln Sentry) are for material identification and compatibility purposes. For specific terms regarding our 24-Hour Rework Guarantee and warranty coverage, please refer to our official CutByBEES Terms & Conditions.